(Clarify and add some sections about program tree and keyboard shortcuts) |
|||
| Line 81: | Line 81: | ||
* When prompted for stubs to import: For a '''new''' port, select only stubs_entry.S (or stubs_entry.S.err) and funcs_by_address.csv. For an existing, working port, select all. |
* When prompted for stubs to import: For a '''new''' port, select only stubs_entry.S (or stubs_entry.S.err) and funcs_by_address.csv. For an existing, working port, select all. |
||
* When prompted for mode, select "Entry points only" if the firmware dump has not yet been analyzed. If you run the script again after analyzing, use load and disassemble. |
* When prompted for mode, select "Entry points only" if the firmware dump has not yet been analyzed. If you run the script again after analyzing, use load and disassemble. |
||
| + | |||
| + | Note: If you find additional stubs or correct misidentified ones after running the script, you can safely run this script again with the "load and disassemble" option. |
||
==Initial auto-analysis== |
==Initial auto-analysis== |
||
Revision as of 23:24, 19 January 2020
Introduction
Ghidra is free, open source software reverse engineering (SRE) suite of tools developed by the NSA. It supports disassembly, de-compilation and professional analysis capabilities on the ARM instruction sets used by the main CPUs of Digic 2 - 7 cameras.
Prerequisites
- Ghidra downloaded from https://ghidra-sre.org/ and installed following the directions at https://ghidra-sre.org/InstallationGuide.html (CHDK scripts support 9.1.x as of late 2019)
- A firmware dump for the camera you want to work on, e.g dumped with Canon Basic dumper script or obtained from the archive.
- Identified ROMBASEADDR
- A CHDK source tree with initial stubs built by the vxworks, dryos or thumb2 sig finder. Optional, but strongly recommended unless you are working on a new model which uses a new CPU architecture or firmware wildly different from known models.
Importing a firmware dump
Create a project, if you don't have one already
In Ghidra, analysis is performed on "programs", which must imported within a "project", so you must create a project if you don't already have one. If you work on multiple firmware dumps, keeping them all in the same project is recommended, because it allows you to have them open at the same time and use the version comparison tool.
Create a new project under File -> New Project.
- A dialog will prompt shared or non-shared. This document assumes you are working alone, so choose non-shared.
- Enter an name and directory and click "finish"
Note: All data related to project will be stored in the project directory. This can amount to several hundred MB per firmware dump.
Load the dump
To add a program, the file(s) must be imported under the File -> Import menu.
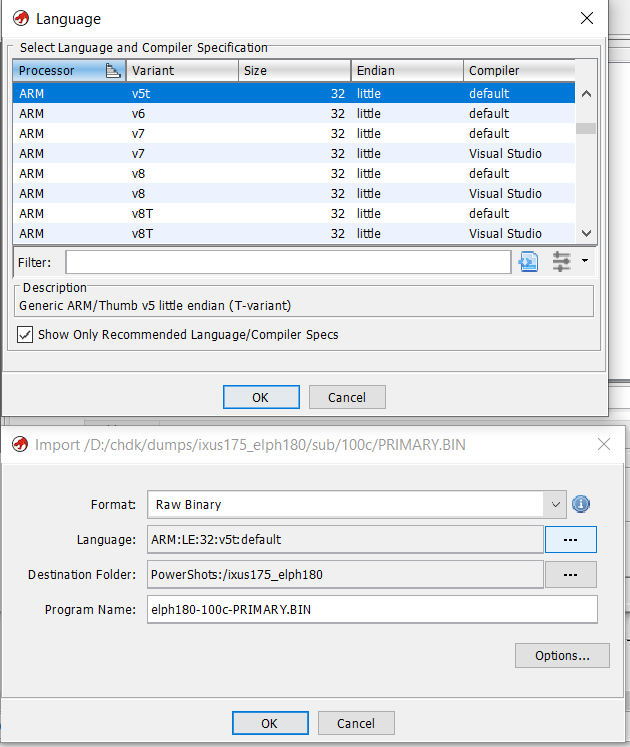
Ghidra language selection and import dialogs
- Select the firmware dump (usually PRIMARY.BIN) for your camera
- Select "Raw binary" for in format.
- "Language" is Ghidra's terminology for CPU architecture
- For Digic 5 and earlier, choose arm, v5t (or v5, see note), little endian, default compiler.
- For Digic 6 and 7, choose arm, v7, little endian, default compiler
- In destination folder, you can choose a project folder to organize your firmware dumps. Making a folder for each model is recommended if you work on many dumps. This "folder" is only a organization tool in the Ghidra UI, it is not a filesystem directory.
- Program name will default to the filename. Changing it to identify the camera and firmware is recommended, because having every firmware called PRIMARY.BIN gets old real quick. Like the folder, this is only in the Ghidra UI and does not affect actual file names.
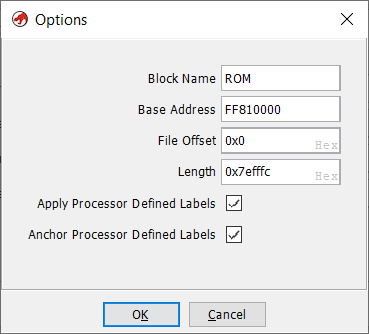
- Under options

Ghidra import options
- Set block name ROM
- Set Base Address to the ROMBASEADDR of your firmware. For existing ports, it will be defined in platform/.../sub/.../makefile.inc or platform/.../makefile.inc. For new ports, it should usually be the start address identified in CBDUMPER.LOG by the Canon Basic dumper script.
- Offset should normally be 0, and length auto-detected.
- Click OK on the import dialog. You will be shown a summary of the import and returned to the main project window.
Note: Digic 5 and below are v5t, meaning they support thumb code. However, Canon firmware for these models does not normally include thumb code. Choosing v5 may avoid having code incorrectly identified as thumb, or accidentally disassembling as thumb in the UI. However, you will not be able to disassemble memory dumps including CHDK code with this setting.
Initial analysis
After you import the dump, you can open it in the "Code Browser" tool by double clicking on the program name. You will see a prompt like "(program) has not been analyzed yet, would you like to analyze it now". For CHDK, additional preparation described below is recommended, so select "No".
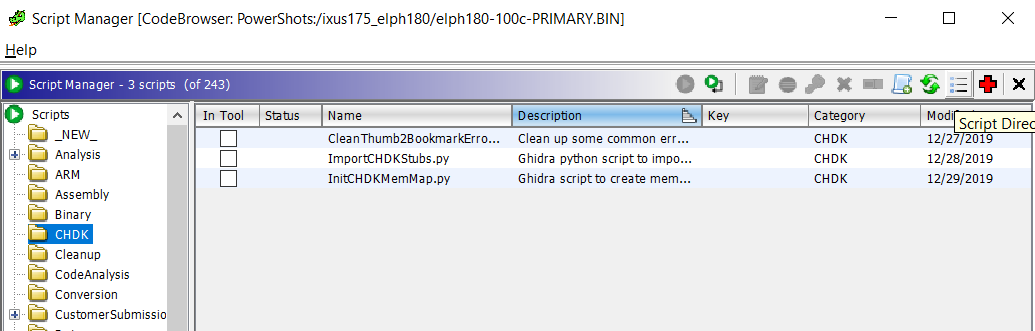
Adding CHDK Ghidra scripts
Some scripts to aid setup and analysis are included in the CHDK source tree, under tools/ghidra_scripts.
- In the Ghidra menu, select Window -> Script manager.
- Click the script directories button on the right of the tool bar (looks like bullet list, 3rd from right)
- Add tools/ghidra_scripts from the CHDK source directory
- Select the CHDK folder at the right to access CHDK scripts
Preparing CHDK stubs files
The CHDK scripts use information generated by the CHDK sig finders, so you need to run the rebuild-stubs step for your port before using them.
You can build stubs with an essentially empty tree. Minimal requirements
- platform/(model) makefile.inc defining ROMBASEADDR, and THUMB_FW for digic 6 and above
- platform/(model)/sub/(firmware) Makefile with just the include ../../../makefile_sub.inc
- empty platform/(model)/sub/(firmware)/makefile.inc
If you copied another port as your starting point, you should comment out or FAKEDEF / NULL_SUB all stubs in stubs_entry.2 and stubs_min.S, to avoid the scripts picking up addresses for the wrong firmware.
Run make PLATFORM=(your platform) PLATFORMSUB=(your sub) rebuild-stubs
It's OK if rebuild-stubs fails due to missing functions: The sigfinder will output found stubs to stubs-entry.S.err, and funcs_by*.csv
Initializing the memory map
Ghidra analysis is significantly improved if a memory map is defined to locate copied code and data at the correct addresses, indicate which regions are expected to contain code, and what address space is expected to be accessed as data.
For Digic 2 - 7 models as of 2019, the InitCHDKMemMap.py script can be used to configure an initial memory map, if CHDK stubs have been built.
- Double click the script in name in the script manager
- Select the platform ... sub directory where you built stubs
- Note on Windows, the Ghidra directory selector combines the selected directory with whatever appears in the "file" text area, so if you click into the final directory, the file part should be empty. Or you can click into parent directory and just select the sub.
- Click OK and the script should run, summarizing the created memory regions in the console window. You can examine or adjust them by clicking on the memory chip icon in the main Code Browser toolbar.
- If the console contains red error text, the script failed
Importing known functions from stubs
The CHDK build process automatically identifies many functions and variables. Defining these in Ghidra before analysis allows Ghidra to start disassembling from known code, which significantly aids analysis.
- Double click ImportCHDKStubs.py in the script manager
- Select stubs directory like the previous scripts
- When prompted for stubs to import: For a new port, select only stubs_entry.S (or stubs_entry.S.err) and funcs_by_address.csv. For an existing, working port, select all.
- When prompted for mode, select "Entry points only" if the firmware dump has not yet been analyzed. If you run the script again after analyzing, use load and disassemble.
Note: If you find additional stubs or correct misidentified ones after running the script, you can safely run this script again with the "load and disassemble" option.
Initial auto-analysis
Once the scripts have been run, autoanalysis can be started. Select Analysis -> Auto analyze... from the Ghidra menu.
The following options are suggested:
- Turn off "embedded media" for the first run, as it seems to misidentify some things as WAV in code. Run it from the one-shot menu afterwards instead
- Turn off "Non-returning functions - discovered". This seems to cause disassembly to stop in a lot of places it shouldn't.
- Turn on "Shared return calls". This helps deal with code that does a B ... after a POP LR. Turning on "allow conditional calls" for this analyzer may also improve results.
- Turn off "address tables". This seems to be better as a one-shot after initial analysis, to avoid creating data from runs of things that could be addresses.
- Select "Scalar operand references", if not selected by default
Click analyze. This can take a long time! You can browse the program while it's analyzing, but it's probably a good time to grab a beverage or snack.
Note: The auto-analysis options don't just apply to the initial, full analysis, they also apply whenever new code is disassembled. So if you turn something off for the initial run, you may want to re-enable it after. The settings are still saved if open the dialog, make changes and cancel.
Post analysis cleanup
- On Digic 6 and above, running CleanThumbBookmarkErrors.py can improve disassembly.
- If you turned off "embedded media" and "address tables" for the initial analysis, you may want to run them as one-shot, and also re-enabled them in auto analysis options. Note address tables can take a long time.
Error bookmarks
Ghidra creates "bookmarks" where disassembly ran into errors. More of the firmware can be successfully analyzed when they are resolved. To view error bookmarks, select "bookmarks" in the window menu, and then click the filter icon (gear) in the bookmarks window toolbar. Clicking on a bookmark will jump to the location. Typical causes of errors are the Ghidra interpreting data as code, or code as data, or starting in the wrong arm/thumb state.
General Usage
On digic 6 and later, use F12 to disassemble in thumb mode, F11 for ARM. On these models, almost all the firmware is thumb. Pre-digic 6 models are all (or virtually all) ARM code.
If you run into large chunks that look like code but don't disassemble well, it's likely they are source blobs that are copied elsewhere, or run on a separate processor, or both. Restricting the executable ranges in the memory map helps avoid this, but the disassembler can still flow outside them.
Recommended settings
- In Edit -> Tool Options -> Listing fields, Operands field: Uncheck "Markup inferred register references". If this is checked, registers in functions that have parameters defined will be shown with the parameter name in disassembly, even when the register has been re-used from something totally different.
Working with multiple firmwares
In many cases, you'll want to look at more than one firmware at once. For example, when porting, you usually want an already ported firmware as a reference. There are several ways to do this:
- Open additional programs in the code browser from the file menu. These show up as additional tabs. This has some quirks: Using the "back" navigation can jump between tabs, and switching tabs causes things like search and string windows to update slowly.
- Open multiple copies of the code browser. This seems to work OK, but you may get warnings about settings conflicting with the other copy.
- Use the Ghidra "version tracking" tool, described in Ghidra Version Tracking workflow for porting. This is by far the best option for porting or doing detailed comparisons.
Program Trees window
The "Program Trees" window allows you to label regions of memory. It defaults to the the regions defined in the memory map, but is not always updated to reflect memory map changes. You can create a fresh tree from the memory map using the "new default tree" button (far left with a green plus) in the toolbar. Trees can be renamed or deleted by right clicking on tab label.
Common Keyboard shortcuts
These mostly act on either the current address, or current selection. You generally have to undefine before converting code to data or vice versa.
- F11 decompile ARM (Thumb supporting CPUs only)
- F12 decompile Thumb (Thumb supporting CPUs only)
- d decompile
- c undefine the current address or selection
- p treat data at current address as a pointer
- ' cycle through various types of strings
- b cycle through integer types