No edit summary |
Waterwingz (talk | contribs) No edit summary |
||
| (16 intermediate revisions by 10 users not shown) | |||
| Line 1: | Line 1: | ||
| + | {{Outdated}} |
||
| + | {{notice|This page describes very old and very difficult ways to obtain a firmware dump. More recent information can be found here : http://chdk.wikia.com/wiki/Obtaining_a_firmware_dump .}} |
||
| + | |||
Please note this page is a work in progress, it is based primarily around my experience dumping the firmware for the S5IS and as a result is primarily geared towards DryOS. |
Please note this page is a work in progress, it is based primarily around my experience dumping the firmware for the S5IS and as a result is primarily geared towards DryOS. |
||
| − | === |
+ | ===Universal dumper=== |
| + | Download [http://chdk.setepontos.com/index.php/topic,964.0.html cardtricks] and use the universal dumper option. |
||
| + | If it works, this is by far the easiest method. |
||
| + | ===Blinking/Hardware Method=== |
||
| − | ====Requirements==== |
||
| + | ; Firmwares dumped using this method |
||
| + | : A610, A700, A540, G7, SD630, A570IS, SD300, SD500, A560, SD1000, S5IS, A720 |
||
| − | You will need |
+ | '''Requirements'''<br />You will need the following; |
| ⚫ | |||
| ⚫ | |||
| + | :*The generic blinker sources (blinker for Soundcard, blink_g7 for Serial Port) <ref>http://grandag.nm.ru/hdk/blinker/</ref> |
||
| − | *A Hex Editor <ref>http://en.wikipedia.org/wiki/Comparison_of_hex_editors</ref> |
||
| + | If your camera lacks the "Firm Update" menu you will also need; |
||
| ⚫ | |||
| ⚫ | |||
| ⚫ | |||
| − | * |
+ | :*A Hex Editor <ref>http://en.wikipedia.org/wiki/Comparison_of_hex_editors</ref> |
| ⚫ | |||
| ⚫ | |||
| + | :NOTE: This is only required for cameras without the "Firm Update" menu option. |
||
| ⚫ | |||
| − | <p> |
||
| − | |||
| ⚫ | |||
| − | |||
| ⚫ | |||
# Extract the files from pre_blinker.rar. |
# Extract the files from pre_blinker.rar. |
||
# Copy one of the *.bin files from pre_blinker.rar to your SD card (diskboot.bin is probably best to start). |
# Copy one of the *.bin files from pre_blinker.rar to your SD card (diskboot.bin is probably best to start). |
||
| Line 22: | Line 28: | ||
# Power the camera up with the card in. |
# Power the camera up with the card in. |
||
# The camera should hang, if not go back to 3 and try the next file, if none of the 3 work you may be out of luck. |
# The camera should hang, if not go back to 3 and try the next file, if none of the 3 work you may be out of luck. |
||
| + | Note that in later sections you should substitute "diskboot.bin" with the filename determined here. |
||
| − | </p> |
||
| ⚫ | |||
| − | <p> |
||
| ⚫ | |||
| − | :NOTE: This is only required |
+ | :NOTE: This is only required when adding a new camera to CHDK, the addresses for cameras already in CHDK are documented. |
# Duplicate the blinker/fw directory from the blinker sources. |
# Duplicate the blinker/fw directory from the blinker sources. |
||
# Replace the contents of main.c with the LED Cycling Code. |
# Replace the contents of main.c with the LED Cycling Code. |
||
| Line 35: | Line 40: | ||
# Modify the range in the Cycling code. |
# Modify the range in the Cycling code. |
||
# Go back to 3 and repeat until you have an address for each LED. |
# Go back to 3 and repeat until you have an address for each LED. |
||
| − | </p> |
||
| ⚫ | |||
| − | <p> |
||
| + | {|border="0" |
||
| ⚫ | |||
| + | |valign="top"| |
||
| − | </p> |
||
| + | [[Image:Basic_SC_Blinker_Receiver.png|thumb|100px|Passive Soundcard Firmware Blinking Receiver]] |
||
| + | |valign="top"| |
||
| + | [[Image:SC_Blinker_Receiver.png|thumb|100px|Active Soundcard Firmware Blinking Receiver]] |
||
| + | |valign="top"| |
||
| + | [[Image:SC_Blinker_Receiver_External_Power.png|thumb|100px|Active Soundcard Firmware Blinking Receiver (External Power)]] |
||
| + | |} |
||
| + | '''Receiver Hardware (serial port method)''' |
||
| + | {|border="0" |
||
| + | |valign="top"| |
||
| + | [[Image:Serial_Blinker_Receiver.png|thumb|100px|Serial Firmware Blinking Receiver]] |
||
| + | |} |
||
| ⚫ | |||
| − | <p> |
||
| + | # Modify the following lines in main.c from the generic blinker firmware; |
||
| ⚫ | |||
| − | # |
+ | #define LED_AF 0x... <set to the address of the LED you want to use for blinking the firmware (AF is generally best)> |
| + | #define LED_PR 0x... <set to the address of the LED you want to use for indication that the camera is not hung> |
||
| + | ## p=(void*)0x... <set to the firmware start address for your camera, most likely 0xffc00000 or 0xff800000) |
||
# Build the new firmware |
# Build the new firmware |
||
| + | # If your camera is one without the "Firm Update" menu rename "main" to diskboot.bin |
||
| + | # Copy PS.FIR and/or diskboot.bin to the root of the SD Card |
||
| + | |||
| + | '''Dumping the firmware (soundcard method)''' |
||
# Attach your receiver to the camera exposing it to the appropriate LED |
# Attach your receiver to the camera exposing it to the appropriate LED |
||
| − | # Set your recording application up appropriately |
+ | # Set your recording application up appropriately (using the generic sources 96kHz 8-bit mono) |
# Start recording |
# Start recording |
||
| − | # Power on the camera |
+ | # Power on the camera (go to the "Firm Update" menu if necessary to initiate the code) |
# Wait until the blinker LED stops |
# Wait until the blinker LED stops |
||
| − | </p> |
||
| + | |||
| + | ===Software method=== |
||
| + | ;Firmwares dumped using this method |
||
| + | : A620, A630, A640, A710, S2IS, S3IS |
||
| + | |||
| + | The method is to make/adapt the WIF loader from original firmware update to similar camera models. As this loader has the functions to work with files, this way allow to just save a dump of original firmware to SD-card. The main problem of using this method is that you have to pass all initialization stages of original firmware in order to be able to write to flash card. |
||
| + | |||
| + | ::Binary for A610e - NO LONGER AVAILABLE, if somebody has a copy please PM me (intrinsic) on the forum or post it and link it here. |
||
| + | ::THIS SEEMS TO BE UNAVAILABLE TOO -> Sources for the S2/S3 dumper - http://grandag.nm.ru/hdk/dumper/<br />OOPS! Page Not Found. But parent site wants to install software on your computer. Possibly a porno site. |
||
| + | :: |
||
TODO: Repackage all necessary sources, etc and make them available in one place, |
TODO: Repackage all necessary sources, etc and make them available in one place, |
||
or better yet get them into subversion. |
or better yet get them into subversion. |
||
<references/> |
<references/> |
||
| + | [[Category:Development]] |
||
| + | [[Category:Firmware]] |
||
Latest revision as of 18:52, 1 February 2014
|
IMPORTANT: The content of this page is outdated. If you have checked or updated this page and found the content to be suitable, please remove this notice. |
|
This page describes very old and very difficult ways to obtain a firmware dump. More recent information can be found here : http://chdk.wikia.com/wiki/Obtaining_a_firmware_dump . |
Please note this page is a work in progress, it is based primarily around my experience dumping the firmware for the S5IS and as a result is primarily geared towards DryOS.
Universal dumper
Download cardtricks and use the universal dumper option. If it works, this is by far the easiest method.
Blinking/Hardware Method
- Firmwares dumped using this method
- A610, A700, A540, G7, SD630, A570IS, SD300, SD500, A560, SD1000, S5IS, A720
Requirements
You will need the following;
If your camera lacks the "Firm Update" menu you will also need;
Determine a Bootable filename
- NOTE: This is only required for cameras without the "Firm Update" menu option.
- Make your SD card bootable as detailed in Bootable SD card
- Extract the files from pre_blinker.rar.
- Copy one of the *.bin files from pre_blinker.rar to your SD card (diskboot.bin is probably best to start).
- Write lock the SD card.
- Power the camera up with the card in.
- The camera should hang, if not go back to 3 and try the next file, if none of the 3 work you may be out of luck.
Note that in later sections you should substitute "diskboot.bin" with the filename determined here.
Find LED Addresses
- NOTE: This is only required when adding a new camera to CHDK, the addresses for cameras already in CHDK are documented.
- Duplicate the blinker/fw directory from the blinker sources.
- Replace the contents of main.c with the LED Cycling Code.
- Build LED Cycling Code.
- Time how long it takes for the LED's to start lighting.
- Estimate a new interval based on how long it took for all the LED's to light.
- Modify the range in the Cycling code.
- Go back to 3 and repeat until you have an address for each LED.
Receiver Hardware (soundcard method)
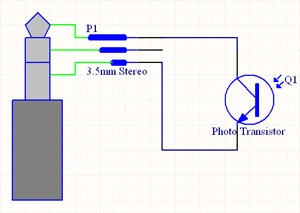 Passive Soundcard Firmware Blinking Receiver |
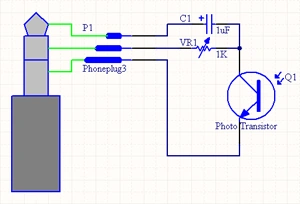  Active Soundcard Firmware Blinking Receiver |
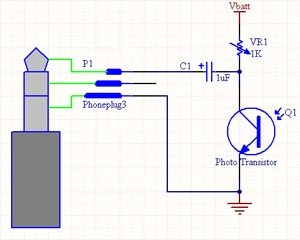  Active Soundcard Firmware Blinking Receiver (External Power) |
Receiver Hardware (serial port method)
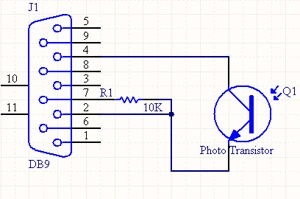  Serial Firmware Blinking Receiver |
Blinker Firmware
- Modify the following lines in main.c from the generic blinker firmware;
#define LED_AF 0x... <set to the address of the LED you want to use for blinking the firmware (AF is generally best)>
#define LED_PR 0x... <set to the address of the LED you want to use for indication that the camera is not hung>
- p=(void*)0x... <set to the firmware start address for your camera, most likely 0xffc00000 or 0xff800000)
- Build the new firmware
- If your camera is one without the "Firm Update" menu rename "main" to diskboot.bin
- Copy PS.FIR and/or diskboot.bin to the root of the SD Card
Dumping the firmware (soundcard method)
- Attach your receiver to the camera exposing it to the appropriate LED
- Set your recording application up appropriately (using the generic sources 96kHz 8-bit mono)
- Start recording
- Power on the camera (go to the "Firm Update" menu if necessary to initiate the code)
- Wait until the blinker LED stops
Software method
- Firmwares dumped using this method
- A620, A630, A640, A710, S2IS, S3IS
The method is to make/adapt the WIF loader from original firmware update to similar camera models. As this loader has the functions to work with files, this way allow to just save a dump of original firmware to SD-card. The main problem of using this method is that you have to pass all initialization stages of original firmware in order to be able to write to flash card.
- Binary for A610e - NO LONGER AVAILABLE, if somebody has a copy please PM me (intrinsic) on the forum or post it and link it here.
- THIS SEEMS TO BE UNAVAILABLE TOO -> Sources for the S2/S3 dumper - http://grandag.nm.ru/hdk/dumper/
OOPS! Page Not Found. But parent site wants to install software on your computer. Possibly a porno site.
TODO: Repackage all necessary sources, etc and make them available in one place,
or better yet get them into subversion.